Friday, June 29, 2012

Chicken Pot Pie

I'm not a huge fan of chicken pot pie. I love the filling and I love the pastry but I don't like them together, what can I say I'm a little strange. However my husband loves it, together! Plus this is one of those dishes that freezes really well. I have in the past made several pies and stuck them in the freezer making the next month really easy!

In the pictures shown there are no mushrooms in the pie because my husband hates mushrooms. I love them and could happily eat a mushroom pie, hmm, interesting idea!!! So if you are wondering why they are in the recipe but not in the pictures that is the answer.


Chicken Pot Pie

Ingredients:

Filling:
1 (3.5lb) whole chicken
5 cups water
2 celery stalk tops with leaves
1 1/4 tsp salt
1/4 tsp pepper
3 Tablespoons/ 1.5 oz butter
3 scallions, sliced
2 large celery ribs, chopped
1/2 cup sliced mushrooms
1/2 cup all-purpose flour
3 carrots, diced and cooked
1 tsp salt
1/4 tsp pepper
1/8 tsp dried thyme
1/4 cup heavy/double cream

Pie Crust:
2 cups flour
1/2 tsp salt
1/2 tsp baking powder
10 Tablespoons/ oz butter, cold and cubed
5 Tablespoons water


Directions:

To make the pie crust:
1. Mix the dry ingredients.
2. Add half the butter to the flour mix and place the other half in the freezer. Bear with me! Rub the butter into the flour mixture with your finger tips, until it is the size of breadcrumbs. You can use a pastry cutter.
3. Add the remaining butter and continue to rub it in until it is the size of small peas. Try to make sure that the butter stays cold.


4.Sprinkle the water into the flour, one tablespoon at a time, stirring with a fork. It should stick together but still look dry.


5. Form into a disk and wrap with cling wrap and place in the refrigerator for at least an hour but ideally overnight.


6. Roll out pastry on a floured surface until larger than the pie dish. Gently place the pastry in the dish and push down to fill it. Trim the edges.


7. Roll out a second piece of pastry for the topping crust. Again just a little bigger than needed.

To make Filling:
1. Add chicken, 5 cups water, 2 celery stalk tops with leaves, salt and pepper in a large Dutch oven. Bring to the boil. Reduce heat and simmer mixture 1 1/2 hours or until chicken is done.
2. Remove chicken, reserving 3 1/2 cups broth in Dutch oven; discard celery tops. Let chicken cool; skin, bone and cut into bite-size pieces.
3. Melt butter in skillet. Saute green onions, chopped celery and mushrooms in hot drippings in skillet over medium heat for 5 minutes or until tender.


4. Gradually whisk in flour until blended.


5. Gradually add reserved broth; cook whisking constantly, for 3 minutes or until thickened and bubbly.


6. Stir in chicken, carrots, salt, pepper, thyme and cream.


7. Spoon mixture into prepared pie dishes. Brush the edge with water. Place the second piece of pastry on top. 
8. Using a fork, crimp the edges of the pie to seal the crust together.
9. Brush the top of the pie with egg white and cut a vent in the top.
10. Bake at 450 degrees F for 25 minutes or until golden and bubbly.

Happy Home Cooking!

Thursday, June 28, 2012

Strawberry oatmeal bars

It's very rare that I see a recipe on the food network that I just have to make that day but Saturday was one of those days. I love the Pioneer Woman, she lives my dream life, a ranchers wife. Now I have my cowboy but we just need our ranch, one of these days!

Anyhow Bree is a woman after my own heart. She's not afraid of real ingredients. Saturday morning she had a recipe for Strawberry oatmeal bars. I didn't even get to see the whole segment but I was sold.

So I gave them a go that afternoon. Man can you say G. O. O. D. Good!!! They are like a yummy oatmeal cookie with delicious strawberry jam! Hey oatmeal is good for you!

I have to say I was a little disappointed in the recipe instructions on the food network website. Bree's recipes are normally so well written. I was glad I pulled the video up in my phone because there were a lot of details missing on the recipe. If you want to see the original recipe here is the link. In the video she said she put 2 sticks of butter, I went with the 1 3/4 sticks. I really don't know if it needs more or not. it was very crumbly so maybe the extra 1/4 stick would help with that. I used regular oats, but she used quick cook. I love oats so using the regular was fine with me.

So I decided to fill in the gaps. Oh and if like me you can't wait for them to cool they are delicious right out of the oven! They keep well in an airtight container.

Strawberry Oatmeal Bars


Ingredients:

1 3/4 sticks butter, cut into pieces
1 1/2 cups all-purpose flour
1 1/2 cups oats, quick cook or regular
1 cup packed brown sugar
1 tsp baking powder
1/2 tsp salt
12 oz jar strawberry preserves

Directions:

1. Preheat oven to 350 degrees F. Butter a 9 by 13 inch rectangular pan. I used a glass pyrex one.
2. Add the flour, oats, brown sugar, baking powder and salt to a bowl and mix to combine.
3. Add butter to the bowl and rub into the flour mixture. You can use a pastry cutter too.
4. Press half the oat mixture into the prepared pan.
5. Spread with the strawberry preserves.
6. Sprinkle the other half of the oat mixture over the top and gently pat down.
7. Bake until light brown, 30 - 40 minutes.
8. Once it has cooled, but into squares and store in an airtight container.

WARNING: If you eat it directly out of the oven, preserve might be hot, try not to burn yourself!!!! It's worth the risk.

Happy Home Cooking!
Saturday, June 23, 2012

Sorry!

Sorry I've been missing this week. I consider myself really blessed that I don't have to work outside the home and can be with my boys every day. However I'm not just a house-wife, homemaker, stay at home mom, or whatever this weeks politically correct name for it is. My husband runs his own businesses and well I'm his secretary, book keeper, office manager, general slave, lol! This week we have been very focused on the business. 

I have to say that I have a new found respect for women that work outside the home and the task you have. I have the option of doing a load of laundry in between phone calls or making the bed after I update a spreadsheet. To think of doing my work and then having to come home and take care of the laundry, the housework and the cooking is overwhelming. I can see why take-out or easy meals helps in that process.

There is a downside to my situation, I never get to officially clock out or leave work. It's always here and multitasking isn't always the easiest thing for me. But when I'm feeling stressed I get to have a hug from my boys and remember why I'm doing it all.

Anyhow I will be trying real hard to get caught up. And hey anyone else wondering where June went to? So July's meal plan will be up in the next week!!!!

Hope you have a good weekend.

Happy Home Cooking!

Tuesday, June 12, 2012

Home Made Blue Cheese Dressing

This dressing the perfect accompaniment to chicken wings. It is also delicious as a salad dressing or dip.

The longer you allow it to sit in the refrigerator the better the taste. It will keep in the refrigerator for a week.

Home Made Blue Cheese Dressing


Ingredients:

1 cup crumbled blue cheese
1/4 cup sour cream
1/4 cup mayonnaise
1/2 cup buttermilk
1 tsp fresh lemon juice
1 clove of garlic minced
Freshly ground black pepper

Directions:

Combine all the ingredients in a small bowl and stir to combine. To make the dressing thicker mash the blue cheese against the side of the bowl and stir it in.

Happy Home Cooking!

Chicken Wings

Chicken wings are one of those dishes that can be an appetizer, party snack or meal. Around here it's wing night once a month.

I have to admit that this is not completely from scratch, I do cheat and use bottled wing sauce. I simply haven't gone all the way and tried. I really want to because everytime I find a sauce I like the store stops carrying that brand.

So talking about sauces when I first made this I used Emeril's Hot Wing sauce. It's a really delicious sauce and wonderfully seasoned, hey it's Emeril! The only problem is I can't seem to find it at any of the local grocery stores. You can order it directly from his website or you can find it on Amazon.

I've tried a few others that I found at the grocery store but currently my favourite is Hooters sauce. I have always heard that Hooters has the best wings but I was sceptical because well what is Hooters really renowned for? Cute girls in skimpy shorts.

About a year ago the CBS show Undercover Boss was about Hooters. I was kinda shocked that the owner and CEO thought of Hooters as a family restaurant. Well after trying the wing sauce with my wings I decided I would have to give it a go. On Mother's Day they were offering free wings for all mothers. I told my husband that's where I wanted to go.

Well yes the uniforms are skimpy and the waitresses are all beautiful girls. But I have to say it was a very pleasant experience and the food was delicious!!! Ok so here is it, officially Hooters I apologise for my mis-judgement!

I do hope to give homemade wing sauce a go. Then I could control the spice level. But that is for a later date. Also if spicy isn't your thing then drizzle the wings with BBQ sauce.

The Blue Cheese Dressing is a must and so delicious. It doesn't last long around here. The further in advance you make it the better the taste. Home Made Blue Cheese Dressing Recipe.

I love adding baby carrots and celery to the plate and recently I started using baby sweet peppers. They are like mini bell peppers and so yummy. Plus the veggies even out the fried wings and fries!

Buffalo-style Chicken Wings


Ingredients:

20 whole chicken wings
1 cup all purpose flour
1 tsp salt
1 tsp freshly ground black pepper
1 tsp cayenne pepper
1/2 tsp garlic powder
Vegetable oil, for frying
2 Tablespoons butter, softened
1 bottle of wing sauce
Baby carrots or 8 large carrots cut into sticks
8 celery ribs, cut into sticks
Baby sweet peppers
Seasoned fries

Directions:

1. Separate the chicken wings into drumettes and wings, discarding the wing tip joint. Place chicken wings and drumettes into a large ziplock bag.
2. In a small bowl, combine flour, salt, pepper, cayenne pepper and garlic powder. Add the seasoned flour tithe plastic bag and toss to coat well.
3. Pour the chicken wings and excess flour onto a baking sheet and spread evenly. Allow the chicken to sit on the floured baking sheet to dry out for about an hour.
4. Preheat deep fryer or a large pot filled halfway with vegetable oil to 350 degrees F.
5. Add the chicken to hot oil and fry until cooked through and crispy, about 10 - 13 minutes.
6. In a large bowl add the butter. Place the wings in the bowl and drizzle with the wing sauce. Toss to coat well. Serve hot with the fries, vegetables and Blue Cheese Dressing on the side.


Happy Home Cooking!

Monday, June 11, 2012

Home-made Tortillas

Ok so I'm going to add a new label and page to the blog Home Cooking Mama Pro. It's going to be for those recipes that just push you past the level of excellence. The recipes that, yes you could go to the store and buy pre-made but, you choose to make yourself.

Home made tortillas definitely qualify. On most shopping trips I have always just picked up a pack. Then one day I saw a recipe and thought why not give it a good. Trust me, I am adding a warning, it will be very difficult to enjoy a store bought tortilla after trying these!

Now the original recipe called for lard. Normally I am not afraid of things like butter and lard but I didn't have any and didn't know if the taste was something I would like. So I just added more shortening. If you are in the UK you can use Trex, Flora White or Cookeen. In the US I used Crisco. And of course you can just use lard.

They really don't take long to make and keep well for a few days in the fridge or can be frozen for a month, but defrost completely before eating. I've made them with fajitas recently and they are simply delicious and make the tortillas taste even better.


Homemade Flour Tortillas


Ingredients:

2 3/4 cups (12 1/2 ozs) unbleached all-purpose flour
1 teaspoon baking powder
3/4 teaspoon kosher salt
5 Tablespoons (2 1/2 ozs) vegetable shortening or substitute equal parts shortening and lard
3/4 cup very warm water

Directions:

1. In a bowl, using a whisk, combine the flour, baking powder and salt. 
2. Add the shortening (and/or lard) and rub into the flour mixture until well incorporated.
3. Gradually mix in the water until dough comes together. It should be a medium-stiff consistency, not as soft as a bread dough but not firm either. Add addition water if needed a Tablespoon at a time.
4. Turn the dough out onto a floured surface and knead until smooth.
5. Divide the dough into 12 portions and roll each into a ball. Set the balls on a plate, cover with plastic wrap, and let rest for at least 30 minutes.
6. Flatten the ball of dough, flour it, then roll forward and backward across it once. Rotate a sixth of a turn and roll forward and back again; continue rolling and turning until you reach the desired circle size. Roll all of them before going to the next step.
7. Heat an ungreased griddle or cast-iron skillet over medium to medium high heat.
8. Lay the tortilla on the hot skillet, there may be a little sizzle noise and you see bubbling across the surface.
9. After 45 seconds or so, when there are light brown marks on the bottom, flip it over and cook for another 30 - 45 seconds until the other side is slightly browned. Be careful not to leave it too long or it will become crispy.


10. Remove from the skillet and place on a dry cloth. Repeat the process with the remaining tortillas and stack them one on top of the other on the cloth. 

Happy Home Cooking Pro style!!!

Grilled Pineapple & Chicken Quesadilla

One of the first things I realised when I moved to Louisiana is that they love their Mexican food. Apart from faijitas I wasn't the biggest fan until I got pregnant with my youngest. Then I seemed to want it all the time. So I have a new found appreciation of it, although there are still some restaurants we go to where it just looks like a puréed mess on a plate.

It is interesting when you start to look at different cuisines and how each kind have their own version of similar dishes. Take Cajun Jambalaya, very similar to Chinese fried rice or Italian
Risotto or Spanish paella. All very similar basic ingredients with a unique blend of spices to that region.

Well quesadillas to me are like a grilled sandwich only instead of bread you use tortillas. Now to jump to the pizza aisle, two of my favorite pizzas are BBQ chicken and Hawaiian. So when I was surfing Pinterest I found this recipe. Grilled pineapple and chicken quesadillas. Another genius idea!

So I figured I would give it a go. I believe The Pioneer Woman is the original creator of this recipe but I found it on The Girl Who Ate Everything blog. (by the way love her blog name and her blog!)

Now if you want to take it to the ultimate Home Cooking Diva level you could make your own tortillas. Trust me they are so easy. Plus I have to say its like tasting the difference from fresh baked bread and a store loaf that's been sitting on the shelf a few days. If you want to give them a try here is the recipe for Home Made Tortillas

I used my panini press to grill the pineapple and chicken and then finished it off on the stove on a skillet. I would have used the press for this but it wasn't big enough and I didn't fancy cleaning up the mess. Although I do know they have several Quesadilla makers available at affordable prices. Think I may add it to my wish list as I love quesadillas!

Also the original recipe called for toasting the tortillas before assembling them. I cut this step out because I like a less crispy quesadilla.

This makes a great lunch or snack food. It's also a great way to use up any leftover BBQ chicken, we always seem to have some. You could even throw the pineapple on the grill and then stick it in the refrigerator and it will really be a quick lunch.

Grilled Pineapple and Chicken Quesadillas


Ingredients:

8 (10 inch) flour tortillas
Butter
1/2 pineapple cut into quarter section
2 boneless chicken breast, pounded thin or butterflied
Tony's creole seasoning or other Cajun seasoning
2 cups shredded Colby Jack cheese
3 Tablespoons of BBQ sauce

Directions:

1. To grill pineapple: place wedges on panini press and close lid and grill. You can also cut into wedges, stick on skewers, and grill over low heat either on a grill, grill pan or skillet. Cut into slices and set aside.
2. To grill chicken: season with the Tony's to taste or just use salt and pepper if you don't want the spice. Place on the panini press and close lid and grill until done. I didn't clean the press after the pineapple because I was cooking the chicken straight away and pineapple juices added a little bonus to the chicken! When the chicken is done brush with the BBQ sauce and shred.


3. To assemble: take four tortillas and spread evenly with cheese, chicken and pineapple. Pour a little extra BBQ sauce over. Place the remaining four tortillas on top.
4. Melt a little butter in a skillet and add each quesadilla to the skillet. Cook until the bottom tortilla is slightly browned and then flip and cook on the other side until the cheese has melted
5. Cut each quesadilla into six wedges. Serve with sour cream and/or BBQ sauce.

Happy Home Cooking!

Facebook giveaway

Just a little update on the giveaway. There are 20 fans now, so thank you to all that have liked the page.


Remember the giveaway will not happen until the 50 fan mark is hit so spread the word. To give you a little incentive and to thank those that have already shared, if you share on your Facebook wall then you will get another entry.

Also you have to actually go to the Home Cooking Mama facebook page and like the page to qualify. Liking the status updates does not count.


Happy Home Cooking!

Tuesday, June 5, 2012

50 Facebook Likes Giveaway!

I need to ask a favour and in return I will be doing a giveaway! Home Cooking Mama has a Facebook page and well we're lacking fans. So my goal is to get 50 fans by the end of June. To those of you that are already my fans thank you, thank you, thank you!

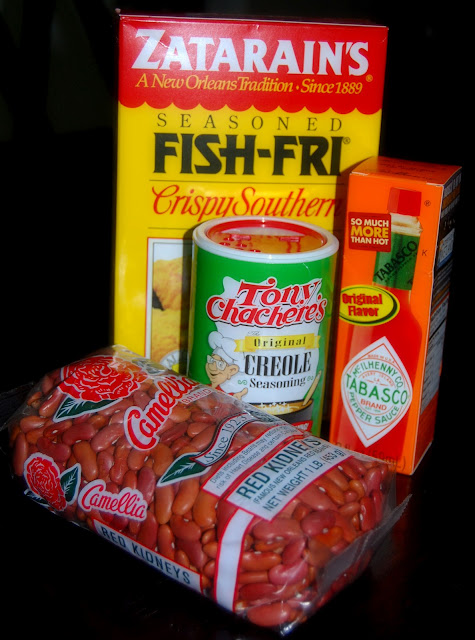
So to the giveaway details. I have put together a little collection of some of my favourite Cajun things. Of course there is my beloved Tony's Creole Seasoning, some Zatarain's Fish Fri , some Camellia Red Beans and the classic Louisiana Tabasco hot sauce.


The giveaway is open to everyone in the world, as long as you have a mailing address, but sorry carrier pigeon isn't an option!

Once the Facebook page has 50 likes I will go to random.org and let it select the winner. Every like is one entry. But you can get an additional two entries giving you three chances to win. Firstly if you sign up to receive emails from the blog. Secondly if you Follow the blog. To make it easier just follow the three steps below.

1. Like Home Cooking Mama on Facebook. Click here
2. Sign up to receive emails, go to the top right column and sign up under the section.
3. Follow the blog, which you can do in the gadget under the email sign up.

So let's hit the 50 mark! Spread the word!!!

Happy Home Cooking!

Lasagna

Lasagna should be the Italian word for comfort food. There's just no other way to describe it. The ultimate one dish meal.


I have always loved it and will admit that many a frozen lasagna was eaten when I was younger. When I moved to the States and started cooking every day it was quickly placed on my list of dishes. I admit I had never made one from scratch before. Most of the recipes I found called for Ricotta cheese which seems to be the American version of lasagna. Now if this is what you have known and love then I am not knocking it but the lasagna I grew up on didn't have ricotta cheese but a delicious white sauce.

Now I did use the ricotta method for years and was ok with it but it was missing that rich creamy layer. So with a little searching I found that it was a bechamel sauce. So no more ricotta and hello creamy layer.

This is a wonderful make ahead dish that you can make and stick in the refrigerator until time to cook. I would add 10 minutes cooking time. You can even go so far as freezing it. Leftovers freeze well and if you cut it into portion size will make the perfect quick lunch or dinner in a hurry.

Serve it with a delicious green salad and garlic bread and you have comfort
food Italian style!

Lasagna

Ingredients:

8oz lasagna noodles (I use about 9 sheets for the dish I use)
1 finely chopped onion
2 cloves garlic, minced
1lb lean (90/10) ground meat
1 tsp Italian seasoning
1 tsp sugar
1 can Hunts Pasta Sauce zesty & spicy (or pasta sauce of your choice)
1/2 tsp Tony's Cajun seasoning
4 cups shredded mozzarella cheese
1/2 cup grated Parmesan cheese, divided
2 oz (1/2 stick) butter
1/3 cup flour
2 cups milk

Directions:

1. Cook pasta according to package directions. Drain and set aside.
2. Heat oven to 350 degrees F.
3. Add onion, garlic and ground meat to a skillet and cook until brown. Stir in sauce, italian seasoning and sugar. Cover and simmer on low heat.
4. To make the bechamel sauce, melt the butter in a medium pan over low heat. Add the flour and stir for 1 minute.
5. Remove from the heat and gradually stir in the milk. Return to the heat and stir constantly until the sauce boils and begins to thicken. Simmer for another minute.
6. Remove from heat and stir in 1/2 tsp of Tony's and 1/4 cup of Parmesan cheese. Place a piece of plastic wrap on the surface of the sauce to prevent a sling forming; set aside.
7. To construct the lasagna use a 13 x 9 inch baking dish. Add a little meat sauce to the bottom, just enough to cover. Layer 3 lasagna noodles, 1/2 the bechamel sauce, 1/3 of meat sauce and sprinkle with mozzarella. Repeat layer one more time. Add 3 more layers and remaining meat sauce. Sprinkle with remaining mozzarella and 1/4 cup of Parmesan cheese.
8. Cover tightly with aluminum foil. Quick tip, spray the foil with cookin spray to prevent it from sticking to the cheese. Trust me this will make life easier!
9. Bake for 30 minutes (40 minutes if cooking from refrigerator).
10. Remove foil and bake an additional 15 minutes or until bubbling. Let stand for 15 minutes before cutting for easier serving.

Happy Home Cooking!

Monday, June 4, 2012

Victoria Sponge Cake and God Save The Queen!

I was feeling very home sick and British this weekend. Her Majesty Queen Elizabeth celebrates her Diamond Jubilee this weekend. And Britain has been encouraged to become a huge street party as in the old days.

I have a huge nostalgic pull to the early to middle 20th century. It seemed a simpler more elegant time. From the sixties on I lose interest and find that things became more out of control. I do feel that I was fortunate that I grew up in rural Northern Ireland in the 80s. Somehow it hadn't been completely tarnished by modern life and technology. There was still a really sense of community and not the modern Facebook community. One where you actually knew your neighbour.

Living in the city, I now live closer to my neighbours than ever and I'm sad to say I don't really know much about them. I remember as a child our neighbours making the afternoon walk up the hill and coming over for tea and to catch up on the 'news'.

I went to a little country Primary School with mainly farmers kids. Most of us are scattered all over now doing all sorts of things but it was a wonderful community to belong to. That was back when school dinners were real food and they still served dessert!!! Oh and full fat milk was ok then too!

I love life in America and have found a deep pride for my new home country. I value the principles it was founded on! I also feel a strong attachment to where I come from and the history that it represents. To me the Royal family are living history. I must give the Queen credit for her long 60 year reign and the grace she has faced all the challenges that the last six decades have thrown at her and her country. When you think about it Churchill was Prime Minister when she became Queen.

Like I said I wish I could have been home to join in the festivities. If she makes it to her Platinum Jubilee I'm going!!!!


So to honour Her Majesty and ease my home sickness I made a Victoria Sponge Cake. Nothing screams summer to me than a Victoria Sponge Cake with fresh whipped cream and strawberries! The cake got it's name from Queen Victoria who is said to have favoured it. Most add a layer of jam or curd as well but I like mine a simple cream version. Although just for a change the next one I make I will do so with jam!

I first made this cake when I was in school and it's the standard beginner cake to learn in Home Economics class as it teaches some great techniques like creaming butter and sugar and folding in flour. A quick note, sometimes the batter can start to curdle when you add the eggs to the butter and sugar. Do this stage slowly and if it looks likes it's starting add a little flour. That was drummed into me and probably one of the few things I remember the most from those days!

I have put the ingredients list in cups and measurements. Baking is so precise and a 'cup' isn't the most accurate measurement. I highly recommend if you bake a lot to get a set of kitchen scales and weigh out your ingredients. An interesting note on this particular cake, the traditional method on weighing the ingredients was to place the eggs on one side of a balance scale and then measure the other ingredients against them. Although this can lead to a drier cake so I recommend just individually measuring the ingredients.

You can even freeze this cake for up to 6 months, minus the cream and filling! Just let it cool completely and wrap in cling wrap, then put it in a freezer bag. You'll have it on hand for a quick dessert or afternoon treat!

I hope you enjoy making this yummy cake, I know I enjoyed my slice. So to Her Majesty Queen Elizabeth II, congratulations of your anniversary and may God bless you! To everyone back home, hope you are having a wonderful time!

Victoria Sponge Cake

Ingredients:

8oz (2 sticks) butter, softened at room temperature
8oz (1 cup) sugar
4 medium eggs
2 tsp vanilla extract
8oz (1 1/4 cups) self raising flour
Dash of milk

Directions:

1. Preheat oven to 180C/350F/Gas 4
2. Grease and line two 8 inch cake pan with parchment paper.
3. Cream the butter and the sugar together in a bowl until pale and fluffy.


4. Beat in the eggs, one at a time, scraping the sides after each addition. Stir in the vanilla extract.
5. Fold in the flour using a large metal spoon, adding a little extra milk if needed, the batter should be a soft dropping consistency.


6. Divide the batter between the cake pans and gently spread out with a spatula.
7. Bake for 20-25 minutes, or until golden-brown on top and a toothpick inserted in the middle comes out clean.


8. Remove from the oven and set aside in pan for 5 minutes. Remove cakes from pan and allow to cool completely on a wire rack.
9. This stage is completely up to you and your preferences. Place one layer on a serving plate and spread with jam, lemon curd or whipping cream. You can also add some chopped up berries. Place the other layer on top. You can either top with more whippig cream and berries (my favourite) or dust with some powdered sugar.


Happy Home Cooking and God Save The Queen!