Showing posts with label Candy. Show all posts

Tuesday, February 14, 2012

Valentine's Strawberry Patties

Happy Valentine's Day!

I don't normally make a big deal for Valentines and if we weren't all nursing colds I'd do more but I decided to give these little gems a go.

At Christmas time I made Peppermint Patties for the first time. Oh my goodness were they beyond delicious and didn't last too long either.

One of the things I miss the most about living in Britain is the candy or sweeties! Man the choice, the quality and the yummy yummy taste. There are a few things I can find here from time to time and Cadburys is readily available but I have to admit I'm more of a Galaxy girl, it's just so creamy. Talking about creamy I prefer milk chocolate. Dark gives me migraines and I really don't like bitter-sweet.

One of my favorite things is Roses chocolates, especially the strawberry and orange cream. And let's not forget my annual indulgence for Cadburys Creme Eggs - man those things are beyond addictive and several of the pounds I need to lose are pure Creme eggs.

Anyhow before I drive myself anymore crazy back to the recipe at hand. The Peppermint Patties were so good and creamy and I got to thinking about those Roses strawberry creams. So I thought what if I switched the peppermint essence for strawberry essence? Can you say DELICIOUS!!!! And there was a nice surprise that when I added the strawberry essence it changed the color to a pretty pink, perfect for the theme at hand!

Talking about theme, as its Valentines I took a small heart shaped cutter and made them into little chocolate covered hearts. I went and got the good stuff for the chocolate to cover them and splurged on Godiva milk chocolate.

I'm not very good at the dipping part and need alot of practice so mine didn't turn out as pretty as I would like but then that gives them that homemade look - well that's my theory and I'm running with it.

Strawberry Patties


Makes about 44 1-inch hearts

1 (32oz) bag confectioner/powdered sugar
4 Tablespoons softened butter
1 tsp vanilla extract
2 tsp strawberry extract
3/4 cup cream
24 oz milk chocolate

1. Mix together sugar, butter, vanilla and strawberry extract in a large bowl. You may wish to use a whisk to combine it.
2. Stir in the cream, it will be stiff to mix but you want a smooth consistency and if you need be add a little more cream do. (As I was making it I was wondering why I didn't do this in my kitchenaid mixer, let it do all the hard work!)
3. Take a tablespoon size portion of the mix and roll into a ball. Place on a baking sheet that has been lined with wax paper and flatten. Repeat with all the mixture.
4. If you want to shape the patties with a cutter then place them in the freezer for 20 minutes. Remove and using the cutter cut out your hearts. Place back in the freezer for 20 minutes more.
5. If you didn't shape them place the round patties on the cookie sheet in the freezer for about 40 minutes.
6. Melt your chocolate in a bowl when you are almost ready to remove them from the freezer, you want a very runny consistency.
7. One by one dip the patties in the chocolate and place on clean wax paper sheet to set. You can speed it up by placing them back in the freezer for a few minutes.
8. Store them in the refrigerate.

Tuesday, December 20, 2011

Sugar Cookies


 I had some little elves in the kitchen last night. A sugar rush before bed is not the best idea! The youngest proved to be a master in cookie thief!


Sugar cookies are so much fun, you can really have some fun with them.


You can use the following recipe or any sugar cookie recipe and use some themed cutters. It is really important to follow all the steps! The dough needs to rest in the fridge and you can make it a few days before you need the cookies. The step to freeze the cookies is really vital to helping the cookies retain their shape. The best baking tip I've heard in a long time is lining your cookie sheet with parchment paper, it makes clean up so much easier! 

Sugar Cookies

Makes about 18 -24 4-inch cookies

Ingredients:

4 cups sifted all-purpose flour
1 tsp baking powder
1/2 tsp salt
1 cup (2 sticks) / 8 oz unsalted butter, room temperature
2 cups granulated sugar
2 large eggs
2 tsp pure vanilla extract.


Directions:

1. Sift flour, baking powder and salt into a bowl.
2. Using an electric mixer, put butter and sugar in a bowl with the paddle attachment. Mix on medium speed until pale and fluffy.
3. Mix in eggs and vanilla.
4. Reduce speed to low. Gradually mix in flour mixture.
5. Divide dough in half; flatten each half into a disk and wrap individually in plastic wrap.
6. Refrigerate until firm, at least 1 hour but ideally overnight.
7. Preheat oven to 325 degrees F.
8. Remove one disk from the fridge and allow to sit at room temperature for about 10 minutes.
9. Roll out the dough until 1/4 inch thick.
10. Cut out the cookies, re-rolling the scraps and repeat with the remaining disk.
11. Transfer to a cookie sheet lined with parchment paper and place cookies in the freezer for about 15 minutes, until very firm.
12. Remove the baking sheet from freezer and transfer shapes to oven. I have 2 cookie sheets and I switch the cookies on the parchment paper that way I'm not putting a hot cookie sheet in the freezer or a cold one in the oven. Again the parchment paper is genius. 
13. Bake, switching positions of sheets and rotating halfway through, until edges turn golden, 15 - 18 minutes.
14. Let cool on wire racks.
15. Decorate with royal icing, sprinkles or buttercream.


Sunday, December 18, 2011

Coconut Ice Squares & Snowballs.

It's the most wonderful time of the year!!!!!

It's no secret I LOVE Christmas, the celebration of the birth of Jesus Christ our Saviour. The world becomes more magical and festivities are abounding, with home cooking taking center stage. And yummy goodies are a special treat.

So I have officially begun my Christmas baking, and I'm going to try and post as many of the recipes as possible to help inspire you!!!!

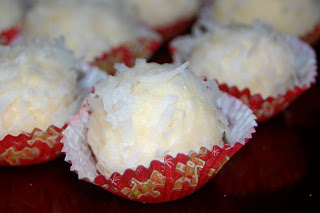
So get us started I'm turning to a real British tradition, Coconut Ice Squares. I'm also including a variation of it, due to the fact I messed up the first batch, Coconut Ice Snowballs. These are really quick and easy treats to make and your kids might really enjoy getting involved. The best part is that if you store them in an airtight container the will keep for up to a month. You don't need to stick to the traditional white and pink colour for the coconut ice squares, you can go festive crazy and use red and green, or whatever colour works for you.

COCONUT ICE SQUARES


Makes about 32 pieces

Ingredients:

1/2 cup / 100g sweetened condensed milk
2 1/2 cups / 250g powdered sugar, sifted
1 1/2 cups / 200g coconut flakes
No taste red food coloring, optional

Directions:

1. Mix together the condensed milk and powdered sugar in a large bowl with a wooden spoon. The mix will get very stiff but make sure its all combined. (Just think all those calories you are burning stirring it will mean you can have a few extra pieces!!!)
2. Add the coconut to the mix and make sure it's well combined. I usually get my hands into the mix at this point, it's a little easier.
3. Split the mix into two and set one half aside. Leave the remaining half in the bowl and add a few drops of the food coloring and knead until combined.
4. Dust a board with powdered sugar, then shape each half into a smooth rectangle shape, placing one on top of the other.
5. Roll the mix until you have a rectangle about 1 - 1 1/4 inches thick. You will want to reshape it with your hands as you roll to ensure it keeps the rectangle shape.
6. Leave uncovered for at least 3 hours or ideally overnight to set.
7. Cut into squares with a sharp night. I usually put each square in a small cupcake wrapper.


COCONUT ICE SNOWBALLS


Makes about 24 snowballs

Ingredients:

3/4 cup / 150g sweetened condensed milk
2 1/2 cups / 250g powdered sugar, sifted, plus 1/4 cup / 25g for coating
1 1/2 cups / 200g coconut flakes, 1/2 cup / 70g for coating

Directions:

1. Mix together the condensed milk and 2 1/2 cups of powdered sugar in a large bowl with a wooden spoon. The mix will get very stiff but make sure its all combined. (Just think all those calories you are burning stirring it will mean you can have a few extra pieces!!!)
2. Add the 1 1/2 cups coconut to the mix and make sure it's well combined. I usually get my hands into the mix at this point, it's a little easier.
3. In a small bowl mix the remaining 1/4 cup of powdered sugar and coconut.
4. Take a tablespoonful of the mix and roll it into a ball, roll the ball in the coconut/sugar mix. If the coating isn't sticking use wet hands to roll the balls.
5. Place the balls in a cupcake wrapper or container and allow to sit uncovered for 3 hours or overnight. Store in airtight contaner