I am so proud of myself. One of my aims has been to completely replace processed food in our diet and find a way to make our favorites from scratch. Well for the longest time Beef Fajitas were my quick and easy open a packet go to meal, the seasoning was prepackaged, the tortillas were prepackaged. Recently for dinner I made Beef Fajitas from scratch, the seasoning was my own and the tortillas were completely homemade.
I cannot begin to tell you how delicious and superior this seasoning is to the McCormick pack. Now I'm not criticizing McCormick, they have been a faithful friend in my kitchen. However I have become more conscious of the label on food. McCromick's Fajitas Mix ingredients are: Spices (including Cumin, chili pepper, and oregano), corn maltodextrin, onion, onion salt, corn syrup solids, garlic, citric acid, caramel color, lime juice solids, modified corn starch and natural flavors. Now in the grand scheme of things that doesn't sound too bad and maltodextrin isn't the worse additive as it's actually from food not chemicals. However I know that glucose based items aren't usually that good for blood sugar. I do wonder why 'caramel color' is required!
I've posted the recipe for the tortillas before and once you have made them from scratch and see how easy they are and how awesome they taste you will have a hard time buy them at the store.
So here is the recipe for Made From Scratch Beef Fajitas. Trust me these are the best fajitas, my father-in-law even loves them and he's a really picky eater!!!!
Beef Fajitas

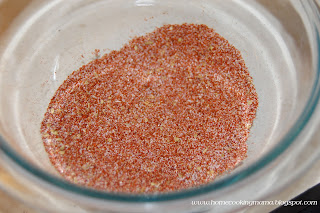
2 tsp chili powder
1 tsp salt
1 tsp paprika
1 tsp sugar
½ tsp onion powder
½ tsp garlic powder
¼ tsp cayenne pepper
¼ tsp oregano
¼ tsp cumin
Tortillas
2 ¾ cups (about 12½ oz) unbleached all-purpose flour
1 tsp baking powder
¾ tsp kosher salt
5 T (2 ½ oz) vegetable
shortening
¾ cup very warm water
Fajitas
1 lb sirloin beef
2 T vegetable oil
1 red bell pepper, cut into
strips
1 green bell pepper, cut
into strips
1 yellow bell pepper, cut
into strips
1 red onion, cut into strips
Directions:
1. Mix all the seasoning ingredients together.
2. Cut up the beef into strips and place in a bowl. Add the seasoning and mix to completely cover.

3. Let the meat marinate in the fridge for at least an hour. You can also freeze the meat marinated.
4. To make the tortillas: in a bowl, using a whisk, combine the flour, baking powder and salt. Add the shortening (and/or lard) and rub into the flour mixture until well incorporated.
5. Gradually mix in the water until the dough comes together. It should be a medium-stiff consistency, not a soft as bread dough but not firm either. Add additional water if needed a Tablespoon at a time.
6. Turn the dough out onto a floured surface and knead until smooth.

7. Divide the dough into 12 portions and roll each into a ball. Set the balls on a plate, cover with plastic wrap, and let rest for at least 30 minutes.

8. Flatten the ball of dough, flour it, and then roll forward and backward across it once. rotate a sixth of a turn and roll forward and back again; continue rolling and turning until you reach the desired circle size. Roll all of them before going to the next step. I've found that adding a little extra flour between them helps to stop them sticking together.
9. Heat 2 tablespoons of vegetable oil in a cast iron skillet. Add the beef and cook, stirring frequently.
10. When the beef has browned add the bell peppers and red onion and continue to cook until they are done. Don't forget to stir it!

11. While the beef is cooking, cook the tortillas. Heat an ungreased griddle or cast-iron skillet over medium to medium high heat.
12. Lay the tortillas on the hot skillet, there may be a little sizzle noise and you will see bubbling across the surface.

13. After 45 seconds or so, when there are light brown marks on the bottom, flip it over and cook for another 30 - 45 seconds until the other side is slightly browned. Be careful not to leave it too long or it will become crispy. Remove from the skillet and place on a dry cloth. Repeat the process with the remaining tortillas and stack them one on top of the other on the cloth.

14. Serve immediately and with all the additions you like, cheese, sour cream, salsa, whatever takes your fancy.
1. Mix all the seasoning ingredients together.

2. Cut up the beef into strips and place in a bowl. Add the seasoning and mix to completely cover.

4. To make the tortillas: in a bowl, using a whisk, combine the flour, baking powder and salt. Add the shortening (and/or lard) and rub into the flour mixture until well incorporated.
5. Gradually mix in the water until the dough comes together. It should be a medium-stiff consistency, not a soft as bread dough but not firm either. Add additional water if needed a Tablespoon at a time.
6. Turn the dough out onto a floured surface and knead until smooth.

7. Divide the dough into 12 portions and roll each into a ball. Set the balls on a plate, cover with plastic wrap, and let rest for at least 30 minutes.

8. Flatten the ball of dough, flour it, and then roll forward and backward across it once. rotate a sixth of a turn and roll forward and back again; continue rolling and turning until you reach the desired circle size. Roll all of them before going to the next step. I've found that adding a little extra flour between them helps to stop them sticking together.
9. Heat 2 tablespoons of vegetable oil in a cast iron skillet. Add the beef and cook, stirring frequently.
10. When the beef has browned add the bell peppers and red onion and continue to cook until they are done. Don't forget to stir it!

11. While the beef is cooking, cook the tortillas. Heat an ungreased griddle or cast-iron skillet over medium to medium high heat.
12. Lay the tortillas on the hot skillet, there may be a little sizzle noise and you will see bubbling across the surface.

13. After 45 seconds or so, when there are light brown marks on the bottom, flip it over and cook for another 30 - 45 seconds until the other side is slightly browned. Be careful not to leave it too long or it will become crispy. Remove from the skillet and place on a dry cloth. Repeat the process with the remaining tortillas and stack them one on top of the other on the cloth.

14. Serve immediately and with all the additions you like, cheese, sour cream, salsa, whatever takes your fancy.
Happy Home Cooking!!!


