Friday, December 30, 2011

Gingerbread Trifle

I hope you all had a very joyful and tasty Christmas.

Today I'm going to do a recipe review. I got a notion, this happens frequently and even though the question "are you pregnant?" follows, the answer is always no. I just get these notions!. Anyhow back to the notion. I wanted to make Trifle as one of my Christmas desserts. Call it a little nostalgia for something British but I really didn't want the traditional British Trifle of Lady Fingers, Custard, Jelly, Fruit and Cream. So to the internet I went. 
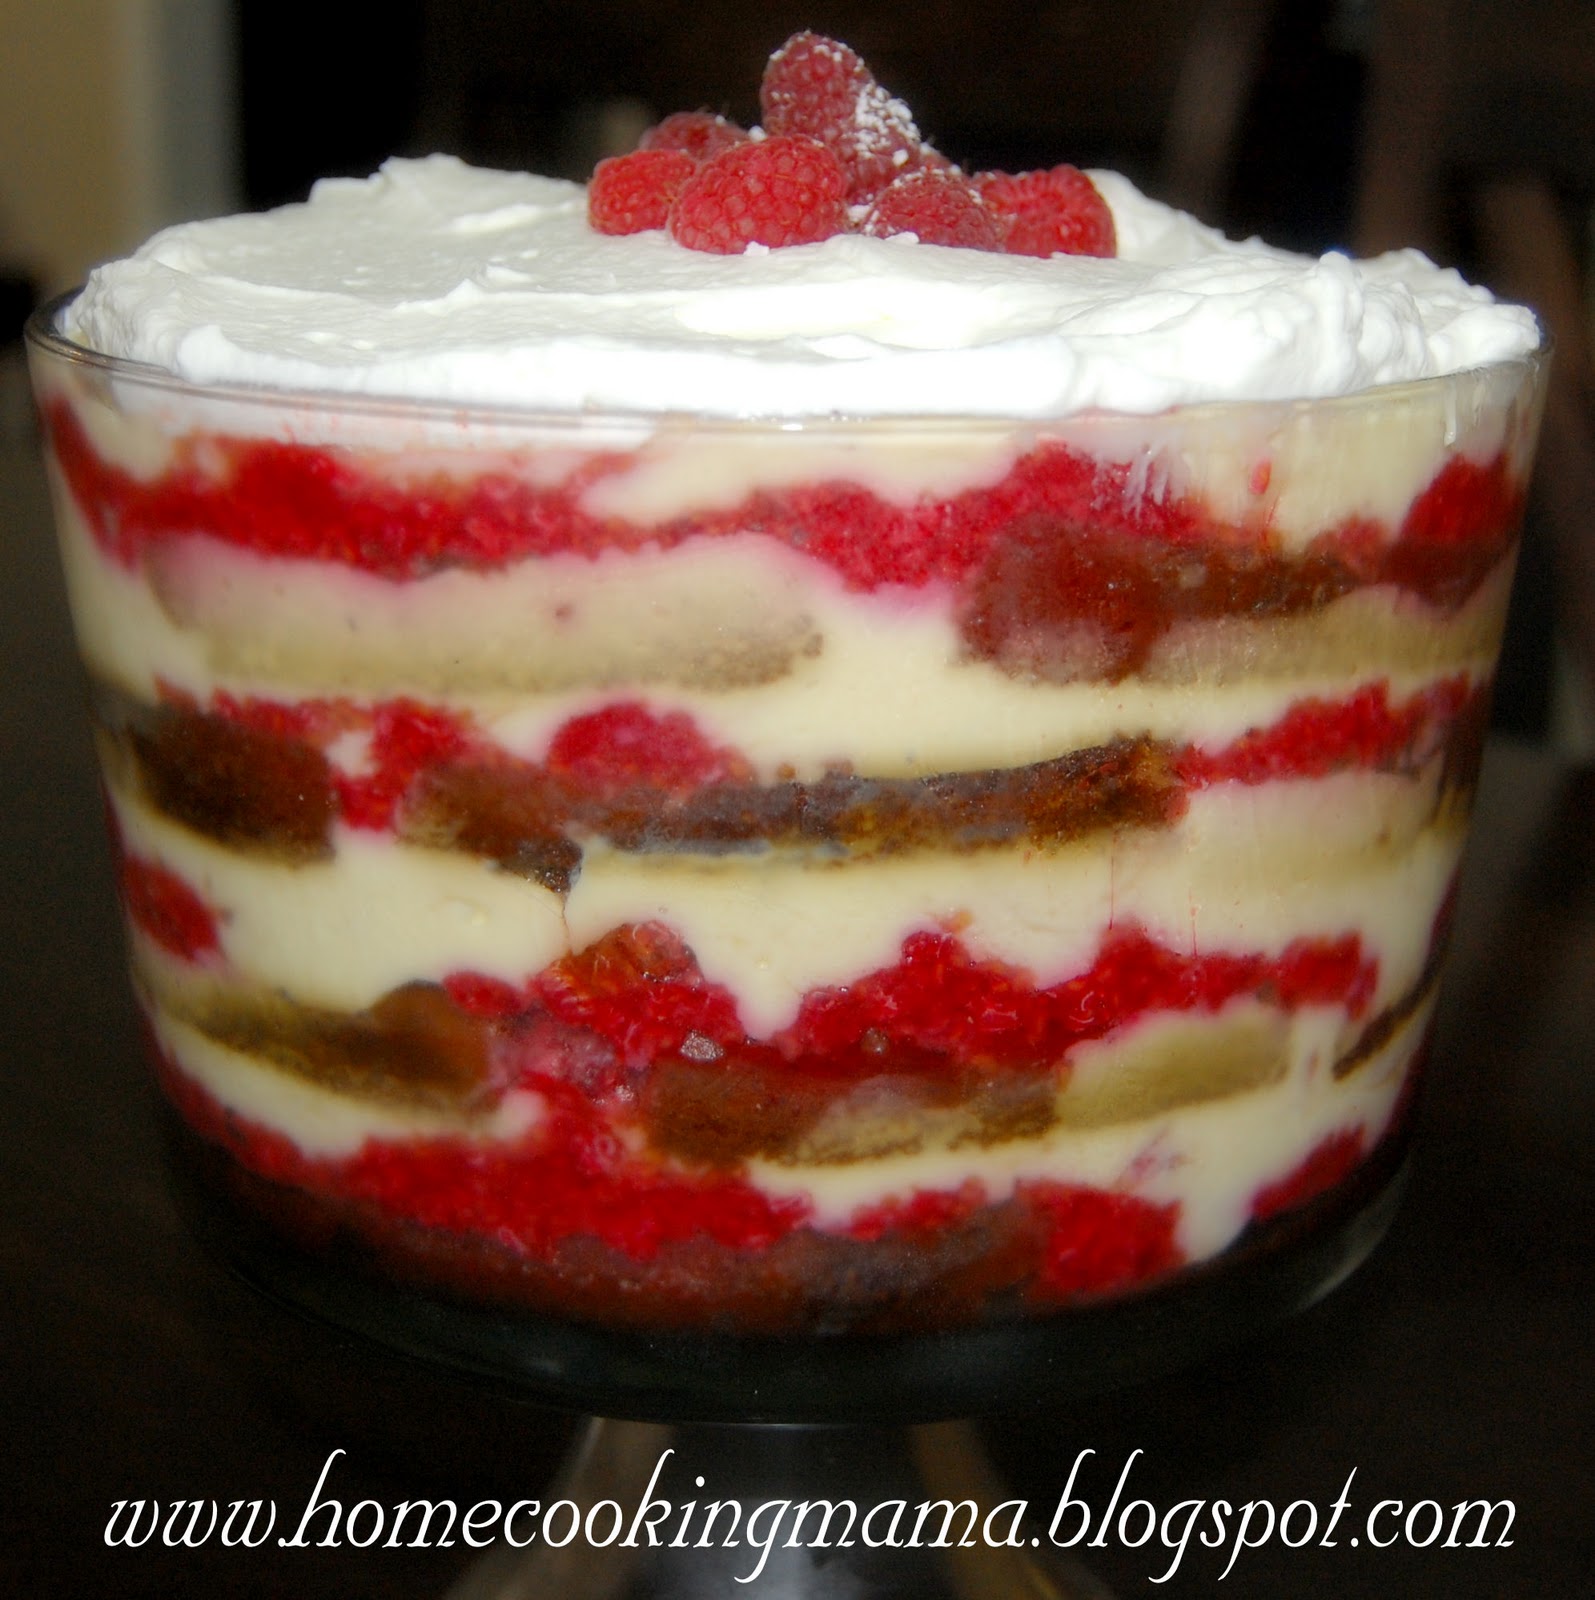
Gingerbread Trifle

I found a recipe for Gingerbread Trifle on Familyfun.go.com, which looked amazing. The link is here:


All the layers sounded delicious and were home made: gingerbread, custard, raspberries and whipped cream.

I was so impressed with the custard recipe and especially proud of myself after I made custard from scratch for the first time and it was so yummy! I feel an Apple and Blackberry Crumble will have to be made this weekend to go with the custard.

The gingerbread was wonderful and could very well stand alone as a bread, it was the perfect density for a trifle and didn't get soggy. 

My only complaint was the raspberry layer, I think pureeing the raspberries and straining to remove any seeds and adding the right amount of sugar to remove the tart taste would be an improvement. It seemed to bring the whole dessert down.

With the improvements to the raspberry layer this is a delicious, impressive dessert. And you really do need to use a trifle bowl to make it, which mine was purchased last minute from Walmart for $6.47 plus tax and it really doesn't look that cheap either. You can also get some mini trifle dishes and make individual servings, perfect for afternoon teas or to help when you serve the trifle, a little less messy option!

Not a bad ending to my first Trifle, I'm thinking something with strawberries for my next attempt!

Tuesday, December 20, 2011

Sugar Cookies


 I had some little elves in the kitchen last night. A sugar rush before bed is not the best idea! The youngest proved to be a master in cookie thief!


Sugar cookies are so much fun, you can really have some fun with them.


You can use the following recipe or any sugar cookie recipe and use some themed cutters. It is really important to follow all the steps! The dough needs to rest in the fridge and you can make it a few days before you need the cookies. The step to freeze the cookies is really vital to helping the cookies retain their shape. The best baking tip I've heard in a long time is lining your cookie sheet with parchment paper, it makes clean up so much easier! 

Sugar Cookies

Makes about 18 -24 4-inch cookies

Ingredients:

4 cups sifted all-purpose flour
1 tsp baking powder
1/2 tsp salt
1 cup (2 sticks) / 8 oz unsalted butter, room temperature
2 cups granulated sugar
2 large eggs
2 tsp pure vanilla extract.


Directions:

1. Sift flour, baking powder and salt into a bowl.
2. Using an electric mixer, put butter and sugar in a bowl with the paddle attachment. Mix on medium speed until pale and fluffy.
3. Mix in eggs and vanilla.
4. Reduce speed to low. Gradually mix in flour mixture.
5. Divide dough in half; flatten each half into a disk and wrap individually in plastic wrap.
6. Refrigerate until firm, at least 1 hour but ideally overnight.
7. Preheat oven to 325 degrees F.
8. Remove one disk from the fridge and allow to sit at room temperature for about 10 minutes.
9. Roll out the dough until 1/4 inch thick.
10. Cut out the cookies, re-rolling the scraps and repeat with the remaining disk.
11. Transfer to a cookie sheet lined with parchment paper and place cookies in the freezer for about 15 minutes, until very firm.
12. Remove the baking sheet from freezer and transfer shapes to oven. I have 2 cookie sheets and I switch the cookies on the parchment paper that way I'm not putting a hot cookie sheet in the freezer or a cold one in the oven. Again the parchment paper is genius. 
13. Bake, switching positions of sheets and rotating halfway through, until edges turn golden, 15 - 18 minutes.
14. Let cool on wire racks.
15. Decorate with royal icing, sprinkles or buttercream.


Sunday, December 18, 2011

Coconut Ice Squares & Snowballs.

It's the most wonderful time of the year!!!!!

It's no secret I LOVE Christmas, the celebration of the birth of Jesus Christ our Saviour. The world becomes more magical and festivities are abounding, with home cooking taking center stage. And yummy goodies are a special treat.

So I have officially begun my Christmas baking, and I'm going to try and post as many of the recipes as possible to help inspire you!!!!

So get us started I'm turning to a real British tradition, Coconut Ice Squares. I'm also including a variation of it, due to the fact I messed up the first batch, Coconut Ice Snowballs. These are really quick and easy treats to make and your kids might really enjoy getting involved. The best part is that if you store them in an airtight container the will keep for up to a month. You don't need to stick to the traditional white and pink colour for the coconut ice squares, you can go festive crazy and use red and green, or whatever colour works for you.

COCONUT ICE SQUARES


Makes about 32 pieces

Ingredients:

1/2 cup / 100g sweetened condensed milk
2 1/2 cups / 250g powdered sugar, sifted
1 1/2 cups / 200g coconut flakes
No taste red food coloring, optional

Directions:

1. Mix together the condensed milk and powdered sugar in a large bowl with a wooden spoon. The mix will get very stiff but make sure its all combined. (Just think all those calories you are burning stirring it will mean you can have a few extra pieces!!!)
2. Add the coconut to the mix and make sure it's well combined. I usually get my hands into the mix at this point, it's a little easier.
3. Split the mix into two and set one half aside. Leave the remaining half in the bowl and add a few drops of the food coloring and knead until combined.
4. Dust a board with powdered sugar, then shape each half into a smooth rectangle shape, placing one on top of the other.
5. Roll the mix until you have a rectangle about 1 - 1 1/4 inches thick. You will want to reshape it with your hands as you roll to ensure it keeps the rectangle shape.
6. Leave uncovered for at least 3 hours or ideally overnight to set.
7. Cut into squares with a sharp night. I usually put each square in a small cupcake wrapper.


COCONUT ICE SNOWBALLS


Makes about 24 snowballs

Ingredients:

3/4 cup / 150g sweetened condensed milk
2 1/2 cups / 250g powdered sugar, sifted, plus 1/4 cup / 25g for coating
1 1/2 cups / 200g coconut flakes, 1/2 cup / 70g for coating

Directions:

1. Mix together the condensed milk and 2 1/2 cups of powdered sugar in a large bowl with a wooden spoon. The mix will get very stiff but make sure its all combined. (Just think all those calories you are burning stirring it will mean you can have a few extra pieces!!!)
2. Add the 1 1/2 cups coconut to the mix and make sure it's well combined. I usually get my hands into the mix at this point, it's a little easier.
3. In a small bowl mix the remaining 1/4 cup of powdered sugar and coconut.
4. Take a tablespoonful of the mix and roll it into a ball, roll the ball in the coconut/sugar mix. If the coating isn't sticking use wet hands to roll the balls.
5. Place the balls in a cupcake wrapper or container and allow to sit uncovered for 3 hours or overnight. Store in airtight contaner

Sunday, December 11, 2011

Christmas Afternoon Tea

One of the events I look forward to at Christmas time is the Afternoon Tea my friend Laura, her mother and sister host. It feels like a real treat in the middle of a busy time.

Drinking tea is like a national past time in Ireland and Afternoon Tea as an event has its roots in British culture. It really is a lost custom. It's much more than tea, sandwiches and pastries it's an opportunity to take a relaxing break and enjoy some wonderful company. I can certainly say that today's Tea was all that. The teas and foods were exceptional.


Some brief highlights were:
A selection of tea sandwiches: chicken salad, pimento, cucumber and strawberry cream cheese (more about that one later)
Lemon poppy-seed, pecan and lemon pistachio scones
Lime and lemon curd
Gingersnap cookies, shortbread, brownie/peppermint thumb nail cookies
Rum cake

Tea selection included:
Glad Tidings, Blackberry Sage, Harrods Strawberry tea, Apple cider tea, and a few others.

Now as I mentioned Laura makes the most amazing Strawberry Cream cheese tea sandwiches! They are so simple, mix some cream cheese, powdered sugar and vanilla, spread it on bread, top with sliced strawberries and add another slice of bread. Remove the crusts and cut into tea sandwich size and oh my goodness pure delight! Who knew that three of my favorite things could be combined in such an delicious way!

It was a wonderful afternoon with the fellowship of some very amazing woman. I think we all need to make a little more time for Afternoon Tea. I am adding it to my New Year's resolution list!


Friday, December 9, 2011

Guacamole!!!

I thought I'd post a nice healthy quick snack recipe and nothing fits the criteria like homemade guacamole. This is so simple but so delicious! Trust me there will be no leftovers!!!! And you are probably wondering how that fits with Irish/Cajun cooking, well it's GREEN!!!!


Ingredients:

4 large ripe avocados
1 tablespoon of finely chopped red onion
2 Roma tomato, deseeded and finely chopped
A few drops of fresh squeezed lime juice
Salt & Pepper to taste

Directions:

1. Spoon out flesh of avocados into a bowl.

2. Add the chopped red onion and chopped roma tomato. You can adjust the amount of both depending on your tastes, my husband isn't big on raw tomatoes so I only put one.

3. Squeeze a few drops of the lime juice into the bowl and add some salt & pepper to your taste preference.


Doesn't it look yummy!

4. Depending on your preference you can leave it chunky, or you can get a hand blender (a handy kitchen to own and very affordable) and blend the mix until you have the consistency you like, we like it creamy!

And voila!

Yummy homemade guacamole and ready as quickly as it takes to chop the ingredient!

Wednesday, December 7, 2011

Chocolate Cupcakes


I love cupcakes! They are the perfect little cake all to yourself. Plus I love chocolate!!!! So here is the perfect combination of two of my favorite things.

I think the trick to these is that you use melted chocolate not cocoa powder. My son who will not eat any sort of cake ate 3 in one sitting without frosting!

I've included my vanilla buttercream recipe, which is so wonderful, it really reminds me of ice cream. The recipe makes about 36 - 40 cupcakes.

Ingredients:

2 3/4 cups cake flour (this is really important because cake flour is lighter than all-purpose flour. It's easily found in most grocery stores, I use the Swann Cake flour)
1 tsp baking soda
1 tsp baking powder
1/2 tsp salt
2 1/2 cups sugar
1 cup (2 sticks) unsalted butter, room temperature
6 oz unsweetened chocolate, melted and cooled to room temperature (it's really important you let if cool before you putting in the mix)
4 extra-large eggs
1 T (tablespoon) plus 1 tsp (teaspoon) pure vanilla extract
1 cup sour cream
1 cup water

Directions:

1. Preheat oven to 325 degrees F.
2. Line 36 standard muffin cups with cupcake liners.
3. In a medium bowl, whisk together flour, baking soda, baking powder, and salt. Quick tip if you toss it all in the bowl and use a hand whisk you don't need to worry about sieving the flour, you break up the lumps with the whisk.
4. Using your electric mixer fitted with the paddle attachment, cream together sugar and butter until light and fluffy, about 5 minutes.
5. Add the chocolate, again let the chocolate cool to room temperature, and beat on medium speed until well combined, about 2 minutes.
6. Add eggs, 1 at a time, mixing well after each addition.
7. Add the sour cream and vanilla and mix until combined.
8. Turn the mixer to low speed, add the flour mixture in 3 parts, alternating with 1 cup of water and beginning and ending with flour, beating until just combined.
9. Fill the muffin cups 3/4 full with batter.
10. Transfer to the oven and bake for 10 minutes. Rotate the muffin pan and bake for a further 10 minutes, make sure that a toothpick inserted in the center comes out clean.
11. Allow to cool before frosting.


Vanilla Buttercream

This recipe makes enough for about 30 cupcakes

Ingredients

1 cup (2 sticks) unsalted butter, room temperature
6 - 8 cups confectioners' sugar
1/2 cup milk
1 tsp pure vanilla extract

Directions:

1. Using an electric mixer fitted with the paddle attachment, cream butter until smooth and creamy about 3 minutes.
2. Turn the mixer to low speed and add 6 cups of sugar, milk and vanilla; mix until light and fluffy.
3. Continue to add the remaining sugar until you reach the desired consistency.

Sunday, December 4, 2011

Construction Birthday Party!

My oldest son turns 4 today! I can't believe how quickly time has flown.

Kids birthday parties are so much, a lot of work and with a little creativity can be wonderful. I loved looking back at my baby pictures to my 1st birthday and see the AMAZING pink palace birthday cake my mother made and decorated for me from scratch by herself. She out did herself the year my brother wanted cowboys and Indians and she made this awesome chocolate fort. There seems to some special about the little details that made the birthday all the more special.

So when I found out I was expected my first I went and took 2 Wilton Cake Decorating classes. I was determined to give my children that same magical experience. Trust me I will not have my own Ace of Cakes kinda show anytime soon. I get frustrated with details and perfection. Butter cream and I have a love hate relationship and I guess I didn't play with play dough enough as a child to be good with fondant! But I am blessed with an amazing friend that has an amazing touch with butter cream and can make it look fondant, together we make a great team. I'll post a few of our cakes soon.

Anyhow I have always LOVED cupcakes. The perfect portion, your very own little cake to enjoy. When it comes to kids birthday parties they are perfect, you don't have the hassle of cutting a cake and they are just simply cute! So after much debate and trying to figure out what sort of cake do to, as much as I would have loved to have done a 3D bulldozer cake, we just didn't think that would be structurally sound and I'm kind of a stickler for the cake actually tasting good and the two don't always go well together.

So I made chocolate cupcakes with vanilla frosting. I found the cupcake stand at the party store in the perfect black color and took caution tape to jazz it up a little.

The top cupcake had the 4 candle and then 4 cupcakes with construction cones. The rest of the cupcakes had yellow hard hat picks.

I'll share my cupcake recipe in the next post because it is delicious and my son who refuses to eat cake of any kind actually ate 3 without frosting. The frosting recipe is addictive, it reminds me more of ice cream than butter cream, as my friend's husband will attest to!!!!

As for the menu, the party was between 3 - 5pm so I did snack food. A veggie tray, some fruit (had to do something healthy to counter all the sugar!), chips and dip, Dorritos, Cheezits, tool shaped cookies, Rice Krispie Treats and my sons favorite candy worms.

I also put a pot of chili on the stove because the LSU SEC Championship game was on at the same time so I figured we'd need some post-party/game food.

Decorations wise I had so much fun everything was construction/Caterpillar orientated as per my sons request! I wanted to do something unusual to serve the food so I went to Lowes and Home Depot.

I found quart and gallon size empty paint cans and printed out a cover for them.

I put the tool cookies in my sons tool box.

I used a metal roller paint tray to put the chips and dip.

My friend found some construction themed plates, napkins and cups for $1 each at a party store back in the summer, we knew then we were doing this, so a little forethought and you can find bargains!

But I have to say the best part was the inflatable hammers I found on Oriental Trading Company's website. We adults had a blast with those too. Each child got a cloth Home Depot tool belt and a yellow hard hat (again from Oriental Trading). A big pile of sand in the back yard, some little construction toys and shovels and they kids had a blast. I must thank LSU for the free entertainment for the adults and GEAUX TIGERS, they won!!!!!

For favors I used brown lunch bags and placed a tool bath squirt, tool bubbles, construction stationary set, tool cookie and some fruit snacks.

The whole thing didn't cost too much, no more than renting a party place and it really didn't require too much time to throw it all together.

It was a wonderful event and my son enjoyed it so much. I can't thank my friend Marti enough for her help brain storming and getting it all together.