Showing posts with label Holidays. Show all posts

Tuesday, February 14, 2012

Valentine's Strawberry Patties

Happy Valentine's Day!

I don't normally make a big deal for Valentines and if we weren't all nursing colds I'd do more but I decided to give these little gems a go.

At Christmas time I made Peppermint Patties for the first time. Oh my goodness were they beyond delicious and didn't last too long either.

One of the things I miss the most about living in Britain is the candy or sweeties! Man the choice, the quality and the yummy yummy taste. There are a few things I can find here from time to time and Cadburys is readily available but I have to admit I'm more of a Galaxy girl, it's just so creamy. Talking about creamy I prefer milk chocolate. Dark gives me migraines and I really don't like bitter-sweet.

One of my favorite things is Roses chocolates, especially the strawberry and orange cream. And let's not forget my annual indulgence for Cadburys Creme Eggs - man those things are beyond addictive and several of the pounds I need to lose are pure Creme eggs.

Anyhow before I drive myself anymore crazy back to the recipe at hand. The Peppermint Patties were so good and creamy and I got to thinking about those Roses strawberry creams. So I thought what if I switched the peppermint essence for strawberry essence? Can you say DELICIOUS!!!! And there was a nice surprise that when I added the strawberry essence it changed the color to a pretty pink, perfect for the theme at hand!

Talking about theme, as its Valentines I took a small heart shaped cutter and made them into little chocolate covered hearts. I went and got the good stuff for the chocolate to cover them and splurged on Godiva milk chocolate.

I'm not very good at the dipping part and need alot of practice so mine didn't turn out as pretty as I would like but then that gives them that homemade look - well that's my theory and I'm running with it.

Strawberry Patties


Makes about 44 1-inch hearts

1 (32oz) bag confectioner/powdered sugar
4 Tablespoons softened butter
1 tsp vanilla extract
2 tsp strawberry extract
3/4 cup cream
24 oz milk chocolate

1. Mix together sugar, butter, vanilla and strawberry extract in a large bowl. You may wish to use a whisk to combine it.
2. Stir in the cream, it will be stiff to mix but you want a smooth consistency and if you need be add a little more cream do. (As I was making it I was wondering why I didn't do this in my kitchenaid mixer, let it do all the hard work!)
3. Take a tablespoon size portion of the mix and roll into a ball. Place on a baking sheet that has been lined with wax paper and flatten. Repeat with all the mixture.
4. If you want to shape the patties with a cutter then place them in the freezer for 20 minutes. Remove and using the cutter cut out your hearts. Place back in the freezer for 20 minutes more.
5. If you didn't shape them place the round patties on the cookie sheet in the freezer for about 40 minutes.
6. Melt your chocolate in a bowl when you are almost ready to remove them from the freezer, you want a very runny consistency.
7. One by one dip the patties in the chocolate and place on clean wax paper sheet to set. You can speed it up by placing them back in the freezer for a few minutes.
8. Store them in the refrigerate.

Friday, December 30, 2011

Gingerbread Trifle

I hope you all had a very joyful and tasty Christmas.

Today I'm going to do a recipe review. I got a notion, this happens frequently and even though the question "are you pregnant?" follows, the answer is always no. I just get these notions!. Anyhow back to the notion. I wanted to make Trifle as one of my Christmas desserts. Call it a little nostalgia for something British but I really didn't want the traditional British Trifle of Lady Fingers, Custard, Jelly, Fruit and Cream. So to the internet I went. 

Gingerbread Trifle

I found a recipe for Gingerbread Trifle on Familyfun.go.com, which looked amazing. The link is here:


All the layers sounded delicious and were home made: gingerbread, custard, raspberries and whipped cream.

I was so impressed with the custard recipe and especially proud of myself after I made custard from scratch for the first time and it was so yummy! I feel an Apple and Blackberry Crumble will have to be made this weekend to go with the custard.

The gingerbread was wonderful and could very well stand alone as a bread, it was the perfect density for a trifle and didn't get soggy. 

My only complaint was the raspberry layer, I think pureeing the raspberries and straining to remove any seeds and adding the right amount of sugar to remove the tart taste would be an improvement. It seemed to bring the whole dessert down.

With the improvements to the raspberry layer this is a delicious, impressive dessert. And you really do need to use a trifle bowl to make it, which mine was purchased last minute from Walmart for $6.47 plus tax and it really doesn't look that cheap either. You can also get some mini trifle dishes and make individual servings, perfect for afternoon teas or to help when you serve the trifle, a little less messy option!

Not a bad ending to my first Trifle, I'm thinking something with strawberries for my next attempt!

Tuesday, December 20, 2011

Sugar Cookies


 I had some little elves in the kitchen last night. A sugar rush before bed is not the best idea! The youngest proved to be a master in cookie thief!


Sugar cookies are so much fun, you can really have some fun with them.


You can use the following recipe or any sugar cookie recipe and use some themed cutters. It is really important to follow all the steps! The dough needs to rest in the fridge and you can make it a few days before you need the cookies. The step to freeze the cookies is really vital to helping the cookies retain their shape. The best baking tip I've heard in a long time is lining your cookie sheet with parchment paper, it makes clean up so much easier! 

Sugar Cookies

Makes about 18 -24 4-inch cookies

Ingredients:

4 cups sifted all-purpose flour
1 tsp baking powder
1/2 tsp salt
1 cup (2 sticks) / 8 oz unsalted butter, room temperature
2 cups granulated sugar
2 large eggs
2 tsp pure vanilla extract.


Directions:

1. Sift flour, baking powder and salt into a bowl.
2. Using an electric mixer, put butter and sugar in a bowl with the paddle attachment. Mix on medium speed until pale and fluffy.
3. Mix in eggs and vanilla.
4. Reduce speed to low. Gradually mix in flour mixture.
5. Divide dough in half; flatten each half into a disk and wrap individually in plastic wrap.
6. Refrigerate until firm, at least 1 hour but ideally overnight.
7. Preheat oven to 325 degrees F.
8. Remove one disk from the fridge and allow to sit at room temperature for about 10 minutes.
9. Roll out the dough until 1/4 inch thick.
10. Cut out the cookies, re-rolling the scraps and repeat with the remaining disk.
11. Transfer to a cookie sheet lined with parchment paper and place cookies in the freezer for about 15 minutes, until very firm.
12. Remove the baking sheet from freezer and transfer shapes to oven. I have 2 cookie sheets and I switch the cookies on the parchment paper that way I'm not putting a hot cookie sheet in the freezer or a cold one in the oven. Again the parchment paper is genius. 
13. Bake, switching positions of sheets and rotating halfway through, until edges turn golden, 15 - 18 minutes.
14. Let cool on wire racks.
15. Decorate with royal icing, sprinkles or buttercream.


Sunday, December 18, 2011

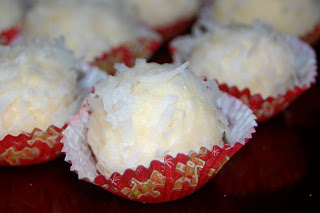
Coconut Ice Squares & Snowballs.

It's the most wonderful time of the year!!!!!

It's no secret I LOVE Christmas, the celebration of the birth of Jesus Christ our Saviour. The world becomes more magical and festivities are abounding, with home cooking taking center stage. And yummy goodies are a special treat.

So I have officially begun my Christmas baking, and I'm going to try and post as many of the recipes as possible to help inspire you!!!!

So get us started I'm turning to a real British tradition, Coconut Ice Squares. I'm also including a variation of it, due to the fact I messed up the first batch, Coconut Ice Snowballs. These are really quick and easy treats to make and your kids might really enjoy getting involved. The best part is that if you store them in an airtight container the will keep for up to a month. You don't need to stick to the traditional white and pink colour for the coconut ice squares, you can go festive crazy and use red and green, or whatever colour works for you.

COCONUT ICE SQUARES


Makes about 32 pieces

Ingredients:

1/2 cup / 100g sweetened condensed milk
2 1/2 cups / 250g powdered sugar, sifted
1 1/2 cups / 200g coconut flakes
No taste red food coloring, optional

Directions:

1. Mix together the condensed milk and powdered sugar in a large bowl with a wooden spoon. The mix will get very stiff but make sure its all combined. (Just think all those calories you are burning stirring it will mean you can have a few extra pieces!!!)
2. Add the coconut to the mix and make sure it's well combined. I usually get my hands into the mix at this point, it's a little easier.
3. Split the mix into two and set one half aside. Leave the remaining half in the bowl and add a few drops of the food coloring and knead until combined.
4. Dust a board with powdered sugar, then shape each half into a smooth rectangle shape, placing one on top of the other.
5. Roll the mix until you have a rectangle about 1 - 1 1/4 inches thick. You will want to reshape it with your hands as you roll to ensure it keeps the rectangle shape.
6. Leave uncovered for at least 3 hours or ideally overnight to set.
7. Cut into squares with a sharp night. I usually put each square in a small cupcake wrapper.


COCONUT ICE SNOWBALLS


Makes about 24 snowballs

Ingredients:

3/4 cup / 150g sweetened condensed milk
2 1/2 cups / 250g powdered sugar, sifted, plus 1/4 cup / 25g for coating
1 1/2 cups / 200g coconut flakes, 1/2 cup / 70g for coating

Directions:

1. Mix together the condensed milk and 2 1/2 cups of powdered sugar in a large bowl with a wooden spoon. The mix will get very stiff but make sure its all combined. (Just think all those calories you are burning stirring it will mean you can have a few extra pieces!!!)
2. Add the 1 1/2 cups coconut to the mix and make sure it's well combined. I usually get my hands into the mix at this point, it's a little easier.
3. In a small bowl mix the remaining 1/4 cup of powdered sugar and coconut.
4. Take a tablespoonful of the mix and roll it into a ball, roll the ball in the coconut/sugar mix. If the coating isn't sticking use wet hands to roll the balls.
5. Place the balls in a cupcake wrapper or container and allow to sit uncovered for 3 hours or overnight. Store in airtight contaner

Sunday, December 11, 2011

Christmas Afternoon Tea

One of the events I look forward to at Christmas time is the Afternoon Tea my friend Laura, her mother and sister host. It feels like a real treat in the middle of a busy time.

Drinking tea is like a national past time in Ireland and Afternoon Tea as an event has its roots in British culture. It really is a lost custom. It's much more than tea, sandwiches and pastries it's an opportunity to take a relaxing break and enjoy some wonderful company. I can certainly say that today's Tea was all that. The teas and foods were exceptional.


Some brief highlights were:
A selection of tea sandwiches: chicken salad, pimento, cucumber and strawberry cream cheese (more about that one later)
Lemon poppy-seed, pecan and lemon pistachio scones
Lime and lemon curd
Gingersnap cookies, shortbread, brownie/peppermint thumb nail cookies
Rum cake

Tea selection included:
Glad Tidings, Blackberry Sage, Harrods Strawberry tea, Apple cider tea, and a few others.

Now as I mentioned Laura makes the most amazing Strawberry Cream cheese tea sandwiches! They are so simple, mix some cream cheese, powdered sugar and vanilla, spread it on bread, top with sliced strawberries and add another slice of bread. Remove the crusts and cut into tea sandwich size and oh my goodness pure delight! Who knew that three of my favorite things could be combined in such an delicious way!

It was a wonderful afternoon with the fellowship of some very amazing woman. I think we all need to make a little more time for Afternoon Tea. I am adding it to my New Year's resolution list!


Wednesday, November 23, 2011

Baked Ham


I LOVE baked ham, if I had to choose between turkey and ham, ham would win everytime.

So I did promise a secret ingredient that has an Irish touch...


GUINNESS!

OK so you are wondering what on earth is she going to do with the Guinness, well the night before the big meal I place the ham in a big pot and pour a few bottles of Guinness over the ham. Then turn the heat on the stove to medium and let the ham boil in the Guinness turning it over after an hour and cook for a further hour. When it has cooled place it in the fridge.

If you want to save time the next day place it in the roast pan you will use and wrap in foil. When it's time to put the ham in the oven I just pour a healthy helping of honey over and cook it according the type of ham it is.

The Guinness adds an extra flavor and anyone that has tried it love it. It's been a tradition in my family and the smell takes me back to Christmas Eve as a child sneaking into the kitchen to see if my parents were in bed so I could see my presents. So for me aside from the smell of a live Christmas tree nothing screams the holidays like the ham on the stove boiling in Guinness!

Tuesday, November 22, 2011

Thanksgiving Menu!

Thursday is Thanksgiving, my ninth. I think it's such a wonderful holiday, because it's simply about giving thanks for all our blessings.

Of course it's a big cooking day, this is one of the few occasions throughout the year that we get to really be extravagant. It's days like this that the Martha Stewart comes out in me and if I was unrestrained would probably have the whole decorating, matching tableware, fine details going on.

So what's on the menu at my house?

Roast Turkey
Roast Ham
Homemade gravy
Roast Potatoes
Green Bean Casserole
Sweet Potato Casserole
Cauliflower Au Gratin
Bread Stuffing
Steamed carrots and Brussel sprouts
Bread
Pecan Pie
Mini Butterscotch Pies
Fresh Fruit Salad

OK yes this is probably extreme but it's THANKSGIVING and I want to spoil my men! Now cooking such a big meal is intimidating and timing is a fine art to work out. The first Thanksgiving I cooked was a disaster. The Sweet Potato Casserole recipe I used called for orange juice and well it would have been better called Orange Casserole because orange was all you could taste.

If you join us and I say we're eating at noon, expect to eat at 1pm. This year I'm planning to be finished by 11am so that we can eat at noon because without fail I always seem to be an hour late.

This year I'm going to do as much as possible on Wednesday, like make the casseroles and pop them in the fridge, that's the wonderful part of casseroles. So with that said, I'm going to share 2 of my casserole dishes, Green Bean Casserole and Cauliflower Au Gratin. I hated cauliflower growing up but have come to love it as an adult and this casserole is so rich and delicious. It does call for Gruyere cheese which is a little more expensive but again it's Thanksgiving so a little luxury added to your dishes is wonderful. White Cheddar or regular cheddar can easily be used.

GREEN BEAN CASSEROLE

2 (10.75oz) cans condensed cream of mushroom soup
3/4 cup milk
1 (2.8 oz) can French Fried Onions
2 cups shredded cheddar cheese
32 oz green beans, cooked (I boil mine with a healthy sprinkling of Tony's Cajun Seasoning)

Directions:

1. Preheat the oven to 325 degrees F (165 degrees C).
2. In a small saucepan, combine mushroom soup, milk and cheddar cheese. Mix together over low heat until melted.
3. Mix in the cooked green beans and pour into a greased casserole dish and top with French fried onions.
4. Bake for 30 - 40 minutes.

Make Ahead: You can make the dish up without adding french fried onions on top and either refrigerate or freeze, just add to cooking time to ensure fully cooked through.


CAULIFLOWER AU GRATIN

1 (3lb) head cauliflower, cut into large florets
4 T (1/2 stick) unsalted butter, divided
3 T all-purpose flour
2 cups hot milk
1/2 tsp freshly ground black pepper
3/4 cup freshly grated Gruyere, divided
1/2 cup freshly grated Parmesan
1/4 cup fresh bread crumbs

Directions:

1. Preheat oven to 375 degrees F.
2. Steam the cauliflower florets until tender but still firm, drain.
3. Meanwhile, melt 2 tablespoons (T) butter in a medium saucepan over low heat. Add the flour, stirring constantly with a wooden spoon for 2 minutes.
4. Pour the hot milk into the butter mixture and stir until it comes to a boil. Boil, whisking constantly, for 1 minute, or until thickened.
5. Off the heat, add 1 tsp of salt, the pepper, 1/2 cup of the Gruyere and the Parmesan.
6. Pour a 1/3 of the sauce on the bottom of a 8 x 11 x 2 baking dish. Place the drained cauliflower on top and then spread the rest of the sauce evenly on top.
7. Combine the bread crumbs and the remaining 1/4 cup of Gruyere and sprinkle on top.
8. Melt the remaining 2 tablespoons of butter and drizzle over the gratin. Sprinkle with salt and pepper.
9. Bake for 25 - 30 minutes, until the top is browned.

MAKE AHEAD: You can construct the casserole up to the end of step 6 and refrigerate. Then complete the remaining steps when you are ready to cook, just add a little extra time to ensure full cooking.

I'll be sharing my Baked Ham recipe tomorrow with it's secret ingredient and Irish touch!